Saturday 16 September 2017

Simplicity Summer Sewing Challenge 2017

When I saw the Simplicity Sewing Challenge being advertised, I couldn't resist entering again for the third time.

On my first attempt I was highly commended and it really boosted my confidence. I love making things for my daughter Miss V, so chose to enter the children's wear category.

The pattern is New Look 6408 and includes a vest, jacket, trousers and a dress.

Miss V and I sat down to discuss design. As usual the theme of cats was requested along with pink and purple. She chose some buttons  (cats of course) and then I could begin. Apart from the buttons and some new thread, all the other materials came from my stash.


My plan was to make the vest and dress with some of my own unique touches!

The basic vest pattern is unchanged, but I was inspired by a tiedyedivablog tutorial to alter the pockets into cat shapes. I used fabric paint to add sleepy cat faces.


I was ordered to put a large cat on the back of the vest, so I used a fantastic free Craftsy paper pieced cat pattern by Sewhooked. I enlarged the pattern to make more of an impact. It's been about a year since I last did paper piecing and I'd forgotten how much fun it can be!


The dress had a few more changes. Miss V likes comfortable fabrics, so i made it from a ponte knit fabric and added an elastic waist.

To change the skirt shape, I cut the pattern piece off at the waist and used a tutorial by onceuponasewingmachine to add box pleats in the contrasting cat print fabric. Because I was using a knit, I didn't use facings and just used the cat fabric to finish the neckline and armholes. With the addition of a bow I was finished!

I really enjoyed these makes and Miss V loved the finished result! The only thing I didn't enjoy was trimming the neck seam and accidentally cutting a hole in the back of the vest! I quickly decided that a heart applique was needed right in that spot.

I look forward to seeing what everyone else has done with the pattern.

Wednesday 28 December 2016

Vintage Pledge 2016 - Number 2

After the success of my first Vintage Pledge, I carried on by making Miss V a bias cut skirt. I chose Simplicity 7504 from 1976.


Pattern description:
Child's Blouse, Bias Skirt and Bag. The blouse softly gathered to yoke has square neckline and set-in sleeves gathered to armholes and with elastic casings, forming self ruffles. Bias skirt has front waistband, back elastic waistband and optional tie ends.

You may remember from my cat appliqué dress that I had some rainbow striped fabric. I wanted to use it for a skirt and was inspired by the striped version (number 3) on the pattern packet. I decided to make the stripes go up rather than down to make it look more like a rainbow.

As the pattern was a size 4, I had to grade it up and ended up adding about 4 inches to the length!

I spent a long time making sure that the stripes would match up, this was the first item I've made where I made an effort to pattern match. I was thankful that it was only a small skirt!

After that difficult part, the skirt came together quite easily, until the time came to add the front waistband. I think my grading hadn't been quite right as it wasn't lining up as the pattern suggested. I had to wing it a bit, but I think it worked out ok!


Miss V liked the colours and it had a nice twirl, but it has a major disadvantage: there are no cats on it!

I may make the top and bag from this pattern in 2017, perhaps for my new Vintage Pledge? I like the idea of adding embroidery, of course it would have to include a cat!


Vintage Pledge 2016 - Number 1

This was my first year of taking part in the Vintage Pledge and I set myself the target of making 5 items. Well it's December already, so I can safely say that I will NOT be meeting my target!

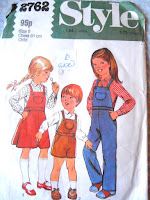
However I'm pleased to actually have something to contribute. I decided to make my daughter a few things for Christmas. I was looking through my vintage patterns and decided on Style 2762 from 1983.


Pattern description:
Child's Dungarees in two lengths, Pinafore and Shirt. Dungarees and Pinafore (with flared, four gore skirt) are elasticised across back and have bib with pocket, front waistband, side front pockets and top stitched trimming. The attached scraps are crossed at back and button fastened at front.

Miss V loves skirts and dresses, so I decided on the pinafore dress. Instead of a pocket on the bib, I   decided to make a paper pieced cat appliqué! I found a template on bejeweledquilts I liked. To make it even more simple, I used a rainbow striped fabric for the main part of the body instead of having to piece it together! I used the same fabric for my other Vintage Pledge make which I'll post soon.


After attached the finished appliqué I sewed the pinafore dress and decided to add some bias binding as a trim around the skirt. I made the binding from the rainbow striped fabric to match the cat and I'm very happy with the result! The main dress is refashioned from a black sheet.


Luckily Miss V loved her dress! It has a cute cat, pockets and twirls nicely. She's already requested another dress with a different coloured cat!

Vintage Pledge item number 1 is now complete.


Thursday 29 September 2016

Simplicity Sewing Challenge 2016

After taking part in the Simplicity Sewing Star competition and being 'highly commended' last year, I was excited to see it was running again for 2016! When I saw the options available for the Simplicity Sewing Challenge, I chose the children's wear pattern Simplicity 1206. This pattern includes a dress, waistcoat, trousers and even a bow tie. It only went up to age 4, so I knew I'd have to grade it up.

My daughter is 5 years old, obsessed with cats, a bit of a tom boy and never walks if she can run or dance! She is most comfortable in leggings and t-shirt, but also likes a skirt or dress she can twirl in.

I decided to make a complete outfit from the pattern, refashioning items I already owned or found in charity shops. I discussed it with Miss V and my brief was:

Colour: Pink / purple
Theme: Cats / flowers

I started by tracing off each piece, grading them up as necessary and deciding what to change.

Simplicity 1206

Dress: I liked the shape of the dress, and the yoke is a nice feature. I decided to keep it simple and make it into a top, but decided to make it from knit fabric to make it comfortable and easy to wear.

Pattern Alterations: As I was making it from knit, I cut a size 4 and left off the bottom ruffle to make a floaty top. The back of the top and yoke were cut on the fold as I didn't need any closures.

I decided to create my own fabric, so made a stamp from a cat drawing by Miss V and cut up a large pink t-shirt. I used a fabric ink pad and was very pleased with the outcome.


Handmade cat stamp

Trousers: I was close to making it a twirly skirt, but Miss V would need to wear it with tights or shorts underneath. I came across a tutorial on Sew Country Chick for culottes, which are modest, but also have a nice bit of movement. I'm not a fan of culottes on adults, but they are very cute on little girls!

The tutorial also inspired me to make them reversible. It was a good excuse to use another cute fabric and easy to turn them around to hide ice cream stains!

Pattern alterations:

As I was making them reversible I omitted the pockets and belt loops to reduce bulk. I removed the pleat from the front piece, straightened the side seams, lengthened the crotch seam and slashed and spread the shorts to give some flare. The elastic goes all the way around rather than having a flat front.

I started off making them knee length, but my first attempt was too long and not wide enough, so I shortened them and added in extra width. Using drapey fabrics from a dress and blouse gave them a nice amount of twirl.

Waistcoat: I was looking at some vintage patterns and was inspired to turn the waistcoat into a kimono sleeve cropped jacket.

Pattern alterations:

I extended the shoulders to turn it into a kimono sleeve and rounded off the front seam to give a nice shape. I made the jacket out of a purple curtain with a black satin lining. I used just 1 button as closure. To make the jacket extra fun, I wanted to use crochet pom pom trim so made some using a tutorial from By Hand London. The longest part was hand sewing it on, but I was very pleased with it.

Crochet pom pom trim


Now it's time to see my cute model, I think she's got just the right amount of attitude!


To make the outfit perfect for Autumn, she paired it with a long sleeved top, tights and boots. The hat and sunglasses help finish off the diva look!

Overall I am very pleased with my outfit. The individual pieces will go well with her other clothes. I love the fact that Miss V had some input and it suits her style perfectly. She especially loves the top, so I think that will get a lot of wear.

My favourite is probably the jacket. I have a circle skirt made from the same fabric and I'm quite tempted to add a pom pom trim to it! I already have another jacket planned for her out of some vintage cat fabric.

I can't wait to hear the results and see the other entries, it's amazing how different they all are!


Saturday 27 February 2016

This pup's gotta fly!

One of my daughters favourite cartoons at the moment is Paw Patrol, which features a boy called Ryder and his team of rescue dogs. One of the pups is called Skye, a pretty little Cockapoo who flies a helicopter.

When I asked my daughter what to make for her friends birthday, her answer was Skye! Luckily the birthday girl loves Paw Patrol as well.

I searched around to find a free Skye crochet pattern, but there didn't seem to be any. I found a Skye made by crochetingwithjoy which had been adapted from a free pattern, so I decided to try and do the same thing.

The original pattern is by anonymous crochet who had made a great basic dalmatian and german shepherd pattern for Marshall and Chase, two of the other rescue pups.

I had to alter the face, body and add her uniform to make it look more like Skye, but I was so grateful someone else had worked out the basic pattern so I didn't have to start from scratch!

Here is the finished pup:


I decided to make Skye's flying cap with googles attached which I was quite pleased with considering I was making it up as I went along! The cap is removable, so it can be taken off when Skye has finished her latest mission.


Hopefully the birthday girl will recognise who it's supposed to be, but my daughter loves it, so I might be making another one very soon. It's her birthday next month, maybe I'll make the whole team!

Friday 29 January 2016

Vintage Pledge 2016

What better way to start the year than with a pledge?

This year I've been watching from afar while other crafters made some amazing items from vintage patterns. I must admit to having a weakness for vintage patterns and I want to improve my dressmaking skills, so I think it's about time I joined in!


My Vintage Pledge:

During 2016, I Kirsty pledge to make at least 5 items from vintage patterns in my stash.


So now I need to start thinking about which patterns to make. The first thing that's been on my mind is a 1970's style back wrap skirt with an appliqué pattern on it. 

I brought Style 2003, a pattern from 1977, but I need to make it bigger and change it to a button fastening. I'll be making View 2 the shorter skirt.


Next up is a pattern I got back in 2014 as part of a sew along on Sew Retro Rose


It's McCall's 5411 from 1960. I've loved the design ever since and seen some great examples online, but still haven't got round to making it yet. 


Here's a couple of other pattern that leapt out at me when I was looking through my stash:


Simplicity 2847 is from 1958 and Simplicity 5586 from 1964. You can tell I'm loving kimono sleeves!

Now the challenge has been set, I'd better get started. Hopefully I'll have my first make to show you soon.

Have you signed up yet? For more details go to #VintagePledge 2016 and join in!

Wednesday 1 July 2015

The winners are announced!

Today was an exciting day, it was time for the winners of the Simplicity Star Sewist competition to be announced.

I entered my version of Simplicity 1364 into the Best Vintage Make category, but wasn't expecting to get anywhere, the other entries I saw were really impressive! This was my entry:


The well deserved winner was Sew and Snip who made some alterations to her pattern to make it into a lovely floaty summer top. 

Imagine my surprise when my entry was then listed as Highly Commended!! I nearly fell off my chair! 

Congratulations to all the winners, if you want to go and have a look you can see the results of all the categories here.

Thank you to Simplicity for inspiring me to challenge myself. I'm just starting another version of 1364 with a collar and fake button placket, I'll post it when it's finished.

I'm looking forward to the next Simplicity Blogger Challenge!


P.s I received this great Highly Commended button to use on my blog. Thank you Simplicity!